
How to Make a Shell Stitch Throw Blanket: Blossom Ridge Throw Blanket Pattern
If you need a project that will give you a relaxing crochet experience while you make a beautiful throw blanket, then you’ll love the Blossom Ridge Throw Blanket pattern! This easy shell stitch throw blanket pattern has one section featuring the 3 Double Crochet Shell stitch, and one section featuring the simple beauty of working in the front loop. Easy and relaxing to make, gorgeous, and cozy to wrap up in, the Blossom Ridge Throw Blanket checks all of the boxes!
This post may contain affiliate links, which means that I receive a commission if you make a purchase through those links at no additional cost to you. Please read full disclosure for more information. Thank you so much for supporting my small business!

Blossom Ridge Throw Blanket
I love designing throw blanket patterns that work up quickly, so alternating sections of stitches are my go-to when creating a new pattern. Moving to a new section every few rows keeps me motivated to keep working, especially on a large project.
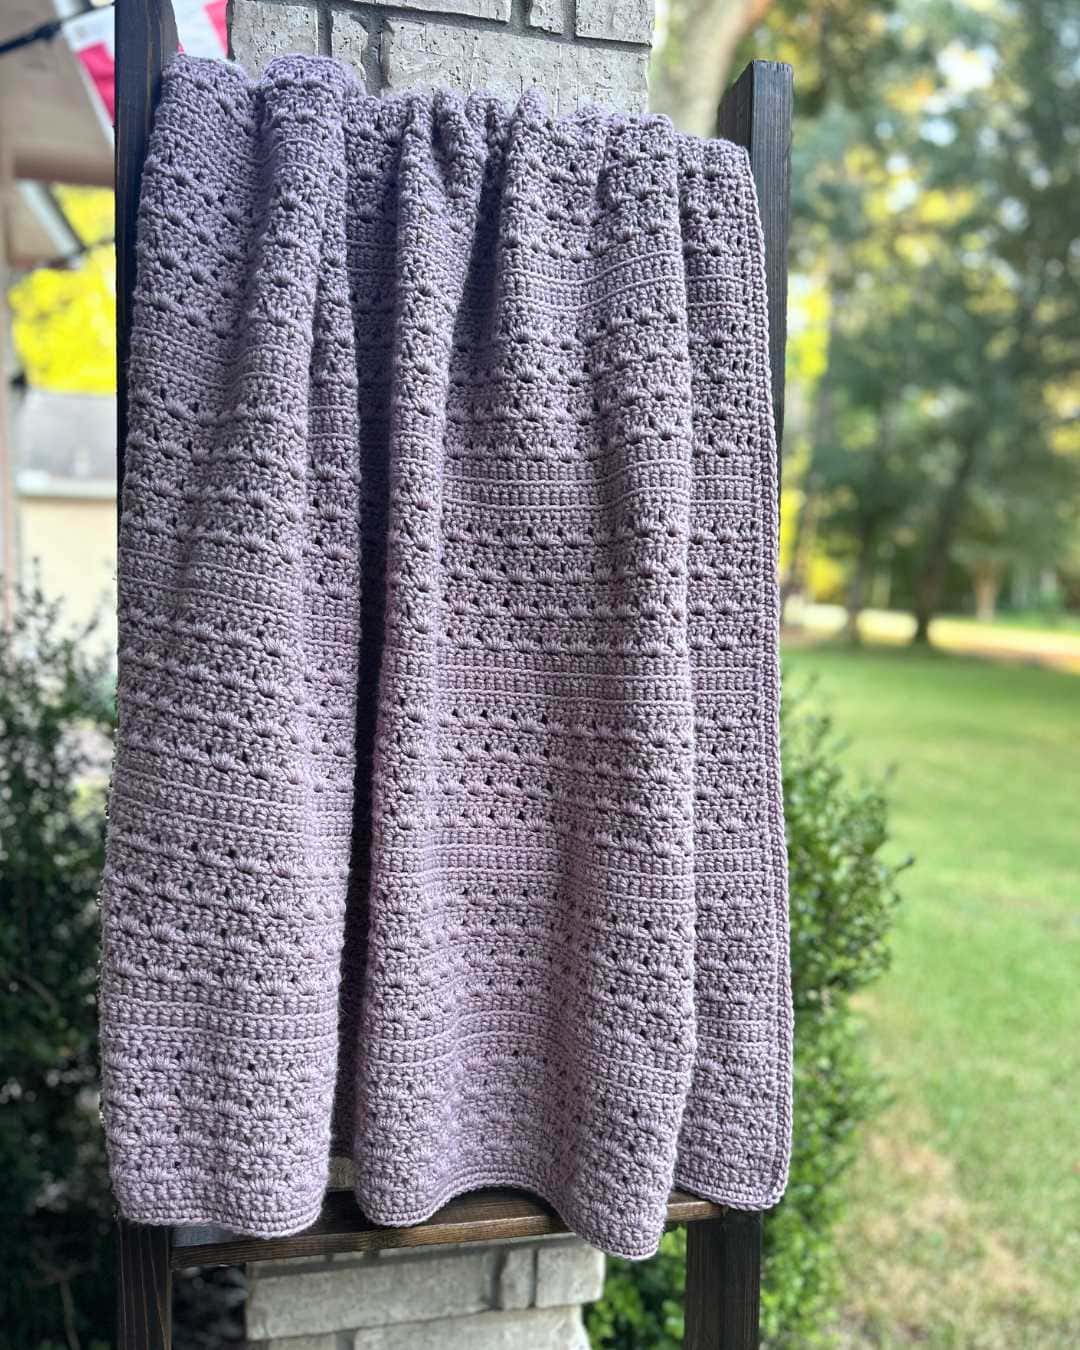
I chose the 3 Double Crochet Shell stitch for the main section because it’s an easy way to add in a more delicate look to a project. The solid sections needed a little something decorative too, so I added some rows of single crochet worked only in the front loop. The lines those rows make totally elevate the project without adding any additional difficulty.
This stitch combination was originally featured in the Blossom Ridge Scarf pattern. I loved it so much I just knew that it would make a great throw blanket. If you’re looking for a small project to work on, or a new accessory, then I highly recommend you check it out!
The Yarn
Caron One Pound is one of my favorite size 4 yarns, so it was an easy choice for this pattern. It’s got amazing stitch definition, and it comes in so many amazing colors! I chose the Fig colorway for this project because I really wanted to work with purple yarn, but this project will look great in any color you choose.
Shop this Pattern
Thank you for scrolling through this pattern on my blog! If you’d like to get a premium, printable copy of the pattern that includes tutorial photos, you can purchase this pattern on Etsy or Ravelry.

If you’re ready to jump in and make your own shell stitch throw blanket, then you’re in the right place! Keep reading for all of the information you’ll need to make your own Blossom Ridge Throw Blanket.
Pattern Details
Skill Level
Easy
Materials
2,220 yds size 4 medium worsted weight yarn. I used 3 skeins Caron One Pound yarn <16 oz/454 gm><812 yds/742 m> in the Fig colorway.
US size K/10.5 crochet hook (6.50 mm)
Scissors, yarn needle
Gauge
12 stitches x 9 rows = 4″ square
Pattern used for gauge: alternating rows of sc and dc
Finished Size
approximately 48.5″ w x 62.5″ l

Stitch Abbreviations – US Crochet Terminology
ch – chain
dc – double crochet
FLO – front loop only
sc – single crochet
sk – skip
sl st – slip stitch
sp – space
st(s) – stitch(es)
stsc – stacked single crochet
yo – yarn over
Special Stitches
Shell
Shell – 3 dc in same sp
A photo tutorial is available for this stitch: How to Crochet the 3 Double Crochet Shell Stitch
Single Crochet Front Loop Only (Sc FLO)
sc FLO- work 1 sc in the front loop of the indicated st
Stacked Single Crochet (stsc)
stsc – sc into indicated st, insert hook under the vertical bar on the left side of the sc, yo and pull up a loop, yo and draw through both loops on hook.
Pattern Notes
The ch 1 at the beginning of a row does not count as a stitch.
The stsc at the beginning of a row counts as 1 dc.
A ch 2 can be substituted for the stsc if desired. If this substitution is used, the last stitch of the row following the use of the ch 2 will be placed in the top of the turning ch.

How to Make This Shell Stitch Throw Blanket
Part 1: Blanket Body
Ch 140
Row 1: sc in 2nd ch from hook and in each ch across, turn <139 sc>
Row 2: ch 1, sc in 1st st and in each of the next 2 sts, [ch 1, sk next st, sc in each of next 2 sts] 44 times, ch 1, sk next st, sc in each of next 3 sts, turn <94 sc, 45 ch-1 sp>
Row 3: stsc in 1st st, dc in next st, sk next st, [Shell in ch-1 sp, sk next 2 sts] 44 times, Shell in ch-1 sp, sk next st, dc in each of next 2 sts, turn <4 dc, 45 Shells>
Rows 4 – 9: repeat Rows 2 – 3 3 times
Row 10: ch 1, sc in 1st st and in each st across, turn <139 sc>
Row 11: ch 1, scFLO in 1st st and in each st across, turn <139 scFLO>
Row 12: ch 1, sc in 1st st and in each st across, turn <139 sc>
Row 13: ch 1, scFLO in 1st st and in each st across, turn <139 scFLO>

Bring more warmth and texture to every project you make.
Get your free 3 Cozy, Textured Stitches guide.
Subscribe to the Measured and Stitched newsletter and your free stitch guide will be on its way. You’ll learn three easy, textured stitches that bring calm and variety to your blankets – plus you’ll get my weekly emails with patterns, tutorials, and cozy crochet encouragement.
Row 14: ch 1, sc in 1st st and in each of the next 2 sts, [ch 1, sk next st, sc in each of next 2 sts] 44 times, ch 1, sk next st, sc in each of next 3 sts, turn <94 sc, 45 ch-1 sp>
Row 15: stsc in 1st st, dc in next st, sk next st, [Shell in ch-1 sp, sk next 2 sts] 44 times, Shell in ch-1 sp, sk next st, dc in each of next 2 sts, turn <4 dc, 45 Shells>
Rows 16 – 21: repeat Rows 14 – 15 3 times
Rows 22 – 141: repeat Rows 10 – 21 10 times
Row 142: ch 1, sc in 1st st and in each st across <139 sc>
At the end of Row 142, do not fasten off. Proceed to border.

Part 2: Border
Notes:
- The border is worked in Rounds. The side you’re working in is clearly identified in the instructions for Rnd 1 as you lay the foundation for the border.
- The ch-2 at the end of each side of Rnd 1 will be referred to as the corner sp in Rnd 2
Rotate 90 degrees.
Rnd 1:
Left side: ch 1, work 190 sc evenly along the left side of the blanket by placing 1 sc in the end of each sc row and 2 sc in end of each dc row, ch 2, rotate 90 degrees. <190 sc>
Bottom: 1 sc in each of next 139 chs, ch 2, rotate 90 degrees. <139 sc>
Right side: work 190 sc evenly along the right side of the blanket by placing 1 sc in the end of each sc row and 2 sc in end of each dc row, ch 2, rotate 90 degrees. <190 sc>
Top: 1 sc in each of next 139 sts, ch 2, sl st in top of sc to join. <139 sc>
Rnd 2: ch 1, sc in same st and in each of next 189 sts, 3 sc in corner sp, sc in next 139 sts, 3 sc in corner sp, sc in next 190 sts, 3 sc in corner sp, sc in next 139 sts, 3 sc in corner sp, sl st in top of sc to join. <670 sc>
Fasten off and weave in ends.
More Places to Find this Pattern
While you can view the pattern right here on the blog, I know that sometimes it’s easier to work from a paper copy! You can purchase a premium, printable PDF copy of the pattern that includes tutorial photos on Etsy or Ravelry. Also, don’t forget to sign up for the Measured and Stitched Newsletter to get a free copy of the Crochet Pattern Progress Tracker!
More Easy Throw Blanket Patterns
I absolutely love making easy throw blankets, and if you’ve made it this far, I bet you do, too! Here are a few more throw blanket patterns that will help you create something beautiful while enjoying the relaxing experience of crochet.
Mountainside Blooms Throw Blanket
Save it for later!
I’m always disappointed when I see something I love online, but then can’t find it when I want to start a new project. Be sure to Pin this project for later so that you know exactly where to find it!

This pattern and its images are copyright protected and the sole property of Measured and Stitched LLC. Please do not redistribute, transfer, or sell the pattern, or alter it to claim as your own. You may sell any products you create from this pattern. Please credit the designer by linking online listings at www.measuredandstitched.com, tagging @measuredandstitched, or using the hashtag #measuredandstitched.