
Paddle Stitch Scarf Pattern: Parkwood Trail Scarf
One of the great things about scarves is that they are so versatile. You can use lightweight yarn to make an accessory for the milder seasons, or you can use bulky yarn and make a cozy scarf that’s perfect for cold weather. The Parkwood Trail scarf uses the paddle stitch to create a gorgeous accessory that is just as pretty as it is warm. Keep reading to find out more about the scarf design, the yarn, and get all of the pattern details!
This post may contain affiliate links, which means that I receive a commission if you make a purchase through those links at no additional cost to you. Please read full disclosure for more information. Thank you so much for supporting my small business!

Paddle Stitch Scarf Pattern: Parkwood Trail Scarf
I live in a part of Texas that doesn’t get super cold in the winter. We have cold snaps, but we very rarely get below freezing. This means that winter accessories need to be a bit breathable and easily removable.
I also just like to wear accessories that are pretty.
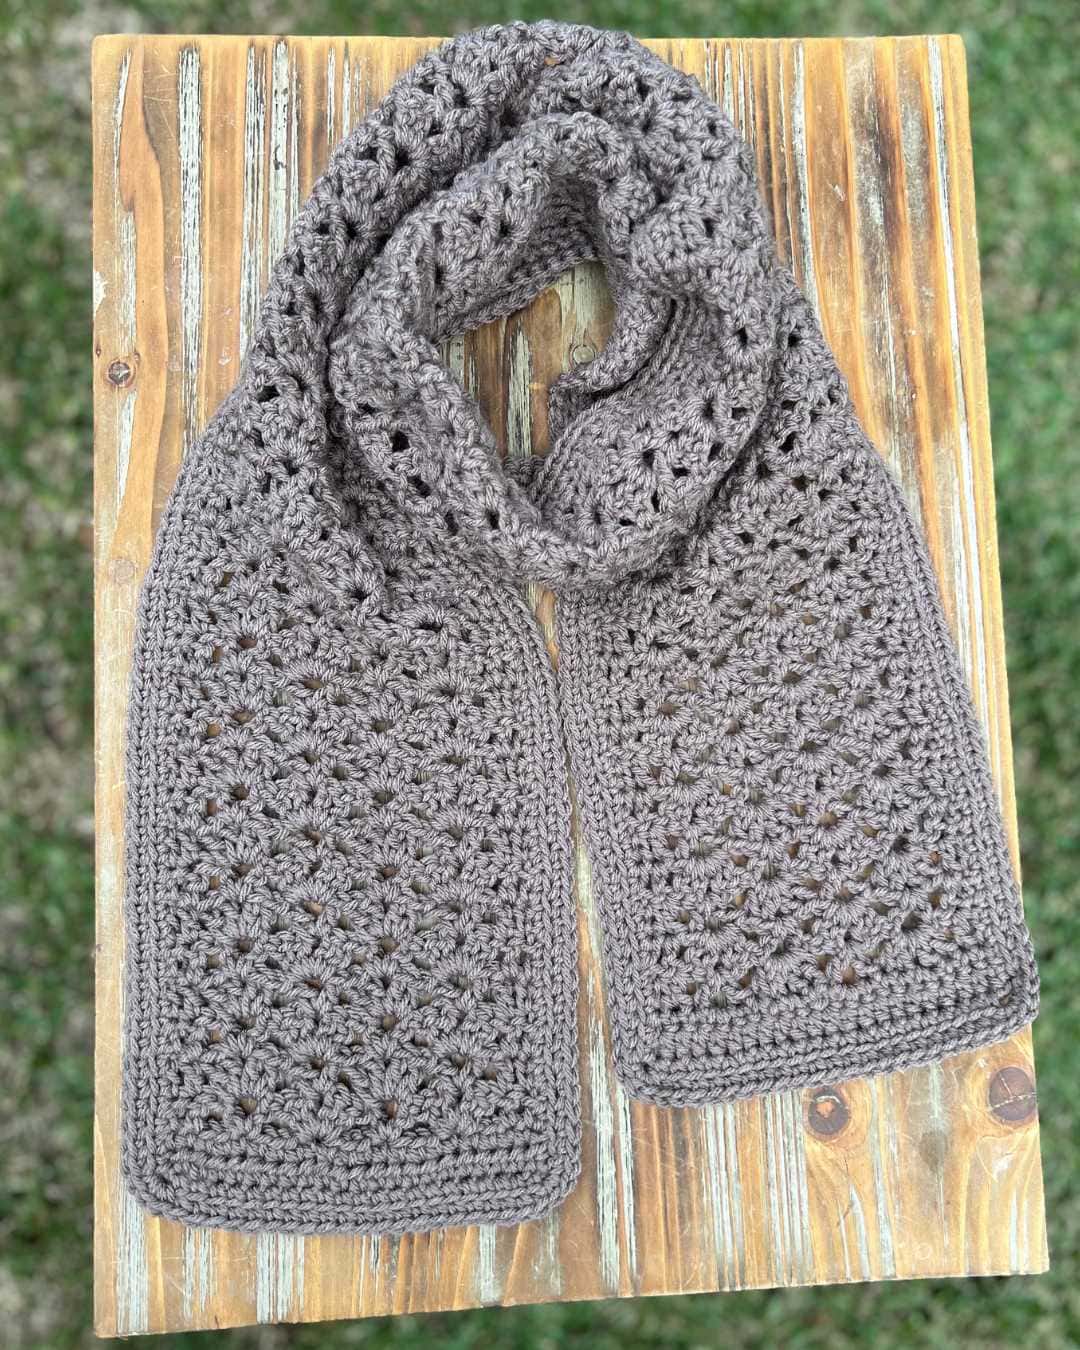
When designing the Parkwood Trail Scarf, I wanted a stitch that had a bit of a lace feel without being too open. I settled on the paddle stitch, and it was the perfect choice. It uses alternating variations of the v-stitch to create an absolutely gorgeous fabric. Once you get started, the paddle stitch is a one-row repeat that works up quickly and leaves you with a beautiful, lacey project that is perfect for wearing or gifting.
The Yarn
I’ve been working through my yarn stash this year, so I decided to use a skein of Big Twist Value that I had left over from making the Oak Grove Throw Blanket. I loved the way it worked up into a scarf when I used it to make the Willowbrook Lane Scarf, so it was the perfect choice for this project. I chose to use the Taupe colorway because it will work with nearly any outfit, but using a bolder color will let you add a pop of color to your fall and winter outfits!
If you’re looking to use yarn from your stash as well, you’ll want to find a size 4 yarn that is soft, but still creates great stitch definition. This will let your scarf have some structure and warmth while staying comfortable to wear.
Shop this Pattern
Thank you for scrolling through this pattern on my blog! If you’d like to get a premium, printable copy of the pattern that includes tutorial photos, you can purchase this pattern on Etsy or Ravelry.

This paddle stitch scarf is a quick make that lets you create an absolutely stunning acecssory. Keep scrolling to find out all of the details and check out the pattern!

Pattern Details
Skill Level
Easy
Materials
295 yds size 4 worsted weight yarn. I used 1 skein Big Twist Value <6 oz/170 gm><380 yds/347 m> in the Taupe colorway.
US size K/10.5 crochet hook (6.50 mm)
Scissors, yarn needle
Gauge
11 stitches x 7 rows = 4″ square
Pattern used for gauge: rows of dc
Finished Size
approximately 8″ w x 60″ l
Stitch Abbreviations – US Crochet Terminology
ch – chain
dc – double crochet
hdc – half double crochet
sc – single crochet
sc2tog – single crochet 2 stitches together
sk – skip
sl st – slip stitch
sp – space
st(s) – stitch(es)
stsc – stacked single crochet
Pattern Notes
The ch 1 at the beginning of a row does not count as a st.
The stsc at the beginning of a row counts as 1 dc.
Special Stitches
Stacked Single Crochet
Stacked Single Crochet (stsc) – sc into indicated st, insert hook under the vertical bar on the left side of the sc, yo and pull up a loop, yo and draw through both loops on hook.
Single Crochet 2 Stitches Together
Single Crochet 2 Stitches Together (sc2tog) – insert hook into indicated st, yo and pull up a loop, insert hook into next indicated st, yo and pull up a loop, yo and draw through all three loops on hook.

Get Started with this Easy Crochet Scarf Pattern
Part 1: Scarf Body
Ch 22
Row 1: hdc in 2nd ch from hook and in each st across, turn. <21 hdc>
Row 2: ch 1, sc in 1st st and in each st across, turn. <21 sc>
Row 3: stsc in 1st st, dc in next st, sk 2 sts, (dc, ch2, dc) in next st, sk 3 sts, (2 dc, ch 1, 2 dc) in next st, sk 3 sts, (dc, ch 2, dc) in next st, sk 3 sts, (2 dc, ch 1, 2 dc) in next st, sk 2 sts, dc in each of last 2 sts, turn. <16 dc, 2 ch-1 sp, 2 ch-2 sp>

Bring more warmth and texture to every project you make.
Get your free 3 Cozy, Textured Stitches guide.
Subscribe to the Measured and Stitched newsletter and your free stitch guide will be on its way. You’ll learn three easy, textured stitches that bring calm and variety to your blankets – plus you’ll get my weekly emails with patterns, tutorials, and cozy crochet encouragement.
Row 4: stsc in 1st st, dc in next st, sk 2 sts, (dc, ch 2, dc) in ch-1 sp, sk 3 sts, (2 dc, ch 1, 2 dc) in ch-2 sp, sk 3 sts, (dc, ch 2, dc) in ch-1 sp, sk 3 sts, (2 dc, ch 1, 2 dc) in ch-2 sp, sk next st, dc in each of last 2 sts, turn. <16 dc, 2 ch-1 sp, 2 ch-2 sp>
Rows 5 – 88: repeat Row 4 84 times
Note: In order for the scarf to have the same number of stitches at the top and bottom, one sc2tog is completed in the center of Row 89. The instructions are bolded in the center of the row so that it’s not missed. Be sure to count your stitches at the end of Row 89 to ensure you have 21 sc before moving on to Row 90.
Row 89: ch 1, sc in 1st st and in each of the next 3 sts, sc in ch-1 sp, sc in each of next 3 sts, 2 sc in ch-2 sp, sc2tog over next 2 sts, sc in next st, sc in ch-1 sp, sc in each of next 3 sts, 2 sc in ch-2 sp, sc in each of next 3 sts, turn <21 sc>
Row 90: ch 1, hdc in 1st st and in each st across, turn. <21 hdc>
At the end of Row 90, do not fasten off. Proceed to border.

Part 2: Border
Notes:
- The border is worked in Rounds. The side you’re working in is clearly identified in the instructions for Rnd 1 as you lay the foundation for the border.
- The ch-2 at the end of each side of Rnd 1 will be referred to as the corner sp in Rnd 2
Rotate 90 degrees.
Rnd 1:
Left side: ch 1, work 176 sc evenly along the left side of the scarf by placing 1 sc in the end of each sc row, 1 sc in the end of each hdc row, and 2 sc in end of each dc row, ch 2, rotate 90 degrees. <176 sc>
Bottom: 1 sc in each of next 21 chs, ch 2, rotate 90 degrees. <21 sc>
Right side: work 176 sc evenly along the right side of the scarf by placing 1 sc in the end of each sc row, 1 sc in the end of each hdc row, and 2 sc in end of each dc row, ch 2, rotate 90 degrees. <176 sc>
Top: 1 sc in each of next 21 sts, ch 2, sl st in top of sc to join. <21 sc>
Rnd 2: ch 1, hdc in same st and in each of next 175 sts, 3 hdc in corner sp, hdc in next 21 sts, 3 hdc in corner sp, hdc in next 176 sts, 3 hdc in corner sp, hdc in next 21 sts, 3 hdc in corner sp, sl st in top of sc to join. <406 sc>
Fasten off and weave in ends.
More Scarf Patterns
I never thought I’d design so many scarf patterns, but the list is getting longer every season! If you like making gifts for others, or having fun accessories to wear when the temperatures drop, here are a few more scarf patterns I think you’ll love.
More Places to Find this Pattern
While you can view the pattern right here on the blog, I know that sometimes it’s easier to work from a paper copy! You can purchase a premium, printable PDF copy of the pattern that includes tutorial photos on Etsy or Ravelry. Also, don’t forget to sign up for the Measured and Stitched Newsletter to get a free copy of the Crochet Pattern Progress Tracker!
Save it for later!
Don’t have time to make this now, but want to make it later? No worries! You can pin this for later so that you can find the Parkwood Trail Scarf pattern when you’re ready to get started.

This pattern and its images are copyright protected and the sole property of Measured and Stitched LLC. Please do not redistribute, transfer, or sell the pattern, or alter it to claim as your own. You may sell any products you create from this pattern. Please credit the designer by linking online listings at www.measuredandstitched.com, tagging @measuredandstitched, or using the hashtag #measuredandstitched.