
Cluster Stitch Blanket Square: Clustered Panes Granny Square
Cluster stitch meets granny square in the beautiful, textured Clustered Panes Granny Square! This easy blanket square is one of the 12 squares in the 2025 Granny Square Stitch Sampler CAL, hosted by Debbie at Madame Stitch. This post contains all of the instructions you’ll need to make this gorgeous square, along with information about how you can make the full project!
This post may contain affiliate links, which means that I receive a commission if you make a purchase through those links at no additional cost to you. Please read full disclosure for more information. Thank you so much for supporting my small business!

Cluster Stitch Blanket Square
I love combining stitches and techniques to make a crochet project. While there’s nothing wrong with using just one stitch, I enjoy the physical and visual textures you get when you pair stitches together. And, if I’m honest, I love working out all of the math, too!
The Clustered Panes Granny Square gets its name from the four unique “panes” created by alternating sections of cluster stitches with solid sections of double crochet. Of course, I couldn’t help but work in the back loop to add some additional texture to the solid sections.
This cluster stitch blanket square builds off of the traditional Granny stitch of three double crochet in the same stitch or space, but takes a unique turn in Round 2 with alternating sides of cluster stitches and double crochets worked in the back loop. I enjoyed working with the alternating stitches because finishing each side felt like a “quick win” and motivated me to keep going!

Granny Stitch Sampler Throw Blanket
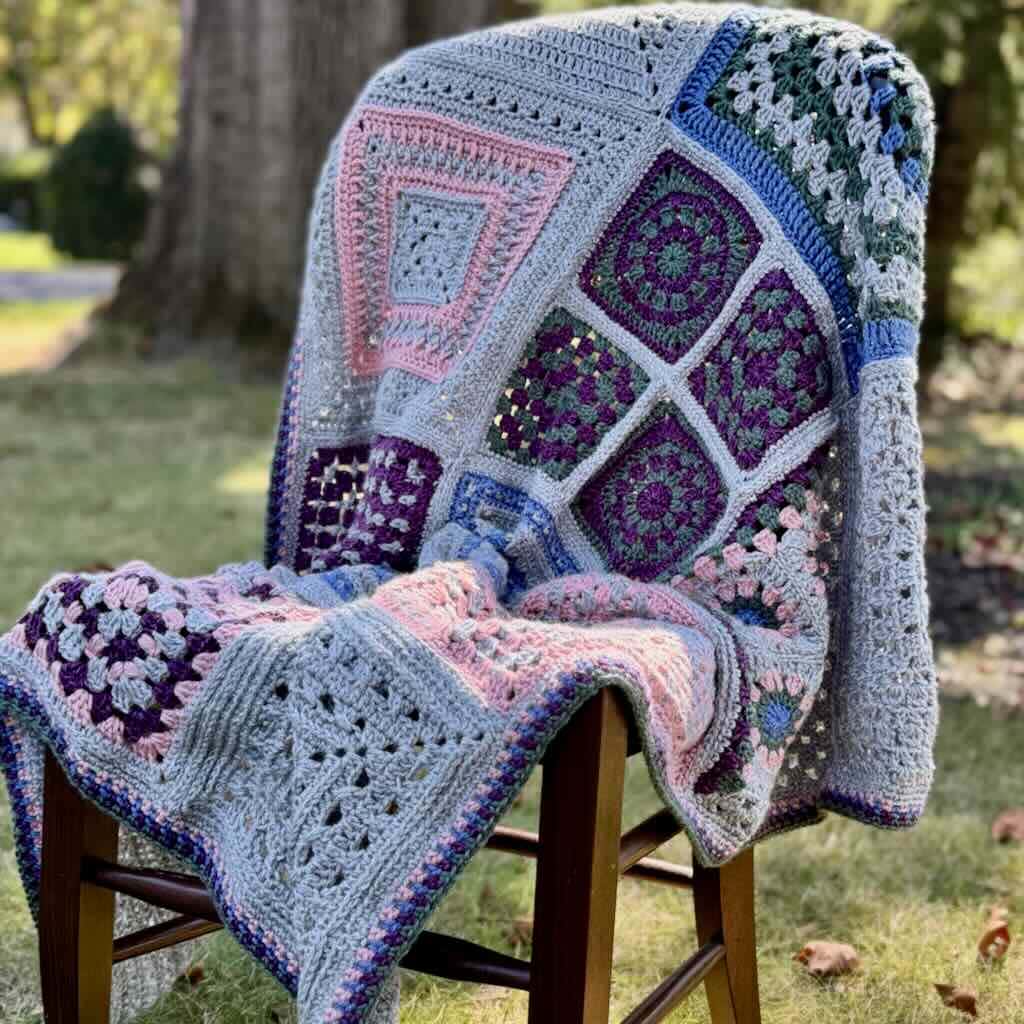
The best part about the Clustered Panes Blanket Square is that it is part of a larger project. This is the third annual Granny Square Throw Blanket Crochet Along that Debbie at Madame Stitch has hosted, and it’s been a hit every single year. Each blanket features 12 unique Granny squares contributed by different designers, and this year’s is absolutely stunning. The picture below shows off all 12 squares, and the finished blanket.

Join the Granny Square Fun!
Join the Granny Square fun and make the full blanket for yourself! Each participating designer has their blanket square free on their blog, and all of the links are organized in the event blog post hosted by Debbie of Madame Stitch. You can get more info about the blanket and find links to all of the free content by clicking on the “Click here to visit the event post” button.
Want to print out the pattern, or work at your own pace? Then you’ll love the 2025 Granny Stitch Sampler Blanket eBook! This eBook includes the full pattern, including additional tutorial photos, and gives you all of the flexibility to complete the blanket on your own timeline without having to navigate through all of the links. You can grab your copy by clicking on the “Click here to buy the full pattern PDF” button


Pattern Details
The instructions for the Clustered Panes Granny Square will help you make one 12″ blanket square. You can combine it together with other squares in the 2025 Granny Stitch Sampler Throw Blanket CAL make the full blanket, or make as many of the squares as you desire and seam them together to make a blanket of Clustered Panes Granny Squares.
Skill Level
Easy
Materials
205 yds / 187 m size 4 medium worsted weight yarn. I used 1 skein of I Love this Yarn <4 oz/115 g> <377 yds/345 m>
US size H-8 crochet hook (5.00 mm)
Scissors, yarn needle
Stitch markers
Gauge
Rnds 1 – 4 = 5″ square
Finished Size
Approximately 12”w x 12″ h
Stitch Abbreviations – US Crochet Terminology
BLO – back loop only
ch – chain
cl – cluster
dc – double crochet
rnd(s) – round(s)
sk – skip
sl st – slip stitch
sp – space
st(s) – stitch(es)
yo – yarn over

Pattern Notes
Magic ring can be used in place of ch 4 to form the initial ring.
Beginning in Rnd 2, the number of stitches across each side is four more than the previous rnd.
Each cl is worked into one st or sp.
Do not turn after any round.
Special Stitches
Back Loop Only (BLO) – work 1 st in the back loop of the st in the previous row.
cluster (cl) – yo and insert hook into indicated st, yo and pull up a loop, yo and draw through 1st two loops on hook, yo and insert hook into same st, yo and pull up a loop, yo and draw through 1st two loops on hook, yo and draw through all three loops on hook.
How to Make the Clustered Panes Granny Square
ch 4, join with sl st to form ring.
Rnd 1: ch 4 (counts as dc and corner sp), [3dc in ring, ch 2] 3 times, 2 dc in ring, join with sl st in 2nd ch of ch 4. <12 dc, 4 ch-2 corner sp>
Rnd 2: sl st in corner sp, ch 2 (counts as dc here and throughout), [dc, ch 2, 2 dc] in corner sp, ch 1, sk next st, cl in next st, ch 1, sk next st, [2 dc, ch 2, 2 dc] in corner sp, dc BLO in next st and in each st across, [2 dc, ch 2, 2 dc] in corner sp, ch 1, sk next st, cl in next st, ch 1, sk next st, [2 dc, ch 2, 2 dc] in corner sp, dc BLO in next st and in each st across, join with sl st in top of ch 2. <2 cl, 22 dc, 4 ch-1 sp, 4 ch-2 corner sp>

Bring more warmth and texture to every project you make.
Get your free 3 Cozy, Textured Stitches guide.
Subscribe to the Measured and Stitched newsletter and your free stitch guide will be on its way. You’ll learn three easy, textured stitches that bring calm and variety to your blankets – plus you’ll get my weekly emails with patterns, tutorials, and cozy crochet encouragement.
Rnd 3: sl st across to corner sp, ch 2, [dc, ch 2, 2 dc] in corner sp, dc in next st, ch 1, sk next st, [cl in ch-1 sp, ch 1, sk next st] across until only one stitch remains, dc in next st, [2 dc, ch 2, 2 dc] in corner sp, dc BLO in next st and in each st across, [2 dc, ch 2, 2 dc] in corner sp, dc in next st, ch 1, sk next st, [cl in ch-1 sp, ch 1, sk next st] across until only one stitch remains, dc in next st, [2 dc, ch 2, 2 dc] in corner sp, dc BLO in next st and in each st across, join with sl st in top of ch 2. <4 cl, 34 dc, 6 ch-1 sp, 4 ch-2 corner sp>
Rnd 4: sl st across to corner sp, ch 2, [dc, ch 2, 2 dc] in corner sp, [ch 1, sk next st, cl in next st or sp] across, ch 1, sk next st, [2 dc, ch 2, 2 dc] in corner sp, dc BLO in next st and in each st across, [2 dc, ch 2, 2 dc] in corner sp, [ch 1, sk next st, cl in next st or sp] across, ch 1, sk next st, [2 dc, ch 2, 2 dc] in corner sp, dc BLO in next st and in each st across, join with sl st in top of ch 2. <10 cl, 38 dc, 12 ch-1 sp, 4 ch-2 corner sp>
Rnd 5: sl st across to corner sp, ch 2, [dc, ch 2, 2 dc] in corner sp, dc in next st, ch 1, sk next st, [cl in ch-1 sp, ch 1, sk next st] across until only one stitch remains, dc in next st, [2 dc, ch 2, 2 dc] in corner sp, dc BLO in next st and in each st across, [2 dc, ch 2, 2 dc] in corner sp, dc in next st, ch 1, sk next st, [cl in ch-1 sp, ch 1, sk next st] across until only one stitch remains, dc in next st, [2 dc, ch 2, 2 dc] in corner sp, dc BLO in next st and in each st across, join with sl st in top of ch 2. <12 cl, 50 dc, 14 ch-1 sp, 4 ch-2 corner sp>

Rnd 6: sl st across to corner sp, ch 2, [dc, ch 2, 2 dc] in corner sp, [ch 1, sk next st, cl in next st or sp] across, ch 1, sk next st, [2 dc, ch 2, 2 dc] in corner sp, dc BLO in next st and in each st across, [2 dc, ch 2, 2 dc] in corner sp, [ch 1, sk next st, cl in next st or sp] across, ch 1, sk next st, [2 dc, ch 2, 2 dc] in corner sp, dc BLO in next st and in each st across, join with sl st in top of ch 2. <18 cl, 54 dc, 20 ch-1 sp, 4 ch-2 corner sp>
Rnd 7: sl st across to corner sp, ch 2, [dc, ch 2, 2 dc] in corner sp, dc in next st, ch 1, sk next st, [cl in ch-1 sp, ch 1, sk next st] across until only one stitch remains, dc in next st, [2 dc, ch 2, 2 dc] in corner sp, dc BLO in next st and in each st across, [2 dc, ch 2, 2 dc] in corner sp, dc in next st, ch 1, sk next st, [cl in ch-1 sp, ch 1, sk next st] across until only one stitch remains, dc in next st, [2 dc, ch 2, 2 dc] in corner sp, dc BLO in next st and in each st across, join with sl st in top of ch 2. <20 cl, 66 dc, 22 ch-1 sp, 4 ch-2 corner sp>
Rnd 8: sl st across to corner sp, ch 2, [dc, ch 2, 2 dc] in corner sp, [ch 1, sk next st, cl in next st or sp] across, ch 1, sk next st, [2 dc, ch 2, 2 dc] in corner sp, dc BLO in next st and in each st across, [2 dc, ch 2, 2 dc] in corner sp, [ch 1, sk next st, cl in next st or sp] across, ch 1, sk next st, [2 dc, ch 2, 2 dc] in corner sp, dc BLO in next st and in each st across, join with sl st in top of ch 2. <26 cl, 70 dc, 28 ch-1 sp, 4 ch-2 corner sp>
Note: In Rnd 9, work each dc BLO into the stitch in the previous row. If that stitch is a ch, work into the ch instead of the ch-1 sp.
Rnd 9: sl st across to corner sp, ch 2, [dc ch 2, 2 dc] in corner sp, [dc BLO in next st and in each st across, [2 dc, ch 2, 2 dc] in corner sp] 3 times, dc BLO in next st and in each st across, join with sl st in top of ch 2. <140 dc, 4 ch-2 corner sp>
Rnd 10: sl st across to corner sp, ch 1 (does not count as st), 3 hdc in corner sp, [hdc BLO in next st and in each st across, 3 hdc in corner sp] 3 times, hdc BLO in next st and in each st across, join with sl st in top of hdc. <152 hdc>
Fasten off and weave in ends. Block to desired dimensions.
Get the Full eBook!
Are you ready to make one of these beautiful blankets for yourself? Grab your copy of the full pattern eBook and get started today! The 2025 Granny Stitch Sampler Blanket eBook includes all 12 patterns and assembly instructions, all written in formatted in their personalized style so that you find some new favorites to add to your list. While you can participate in the event free on the blog, the eBook is a great option for crocheters who want to work at their own pace, or work off of a printed copy.
A Few More Square Crochet Patterns
Next time you’re in the mood to work a project in the round, you should try out these square crochet projects!
Save it for later!
Pinterest is a great way to keep up with all of the patterns in your queue. If you’re not ready to get started right now, be sure to pin this pattern so that you can come back later!

This pattern and its images are copyright protected and the sole property of Measured and Stitched LLC. Please do not redistribute, transfer, or sell the pattern, or alter it to claim as your own. You may sell any products you create from this pattern. Please credit the designer by linking online listings at www.measuredandstitched.com, tagging @measuredandstitched, or using the hashtag #measuredandstitched.
