
How to Crochet the Front Post Treble Crochet Stitch
Post stitches are lots of fun to incorporate into a crochet project! You can use front and back post stitches to create blanket borders and ribbing on garments and accessories. You can also use them to add texture or cables and other creative designs to a crochet project. While you can do a post stitch with any of the basic crochet stitches such as single crochet, double crochet, or treble crochet, this tutorial will focus on the Front Post Treble Crochet.
This post may contain affiliate links, which means that I receive a commission if you make a purchase through those links at no additional cost to you. Please read full disclosure for more information. Thank you so much for supporting my small business!

Front Post Treble Crochet (FPtr) Stitch Tutorial
The Front Post Treble Crochet is unique because it is a regular treble crochet stitch worked around the post of a stitch in the previous row. This technique causes both stitches to pull forward and become raised. This is a great way to use to add ribbing, cables, or texture to a project!
I prefer to work with smaller stitches (the half-double crochet stitch is my favorite!). They usually make a more dense and structured fabric. When it comes to post stitches, though, I’ve learned that the best choice is the one that pairs well with the other stitches in your project.
I like to use the Front Post Treble Crochet with projects that are made mostly of double crochet stitches. This allows the finished post stitch to be approximately the same height as the double crochet stitches in the current row, and also keeps the fabric from curling as you work. However, since the Front Post Treble Crochet can be used for a variety of purposes, it can be used in nearly any project.
Want to try this stitch in a project? You can find the Twin Ridges Baby Blanket pattern free on the blog!
Materials Info
You can use any yarn and the appropriate size hook to complete this stitch. For this tutorial, I’m using the following supplies:
- Yarn: Yarn Bee Soft & Sleek Chunky in the Light Gray and Sage colorways
- Hook: Clover Amour US Size K/10.5 (6.50 mm) crochet hook
I used two colors to show how the stitch looks as it’s worked around a the post, but it’s not required. You can definitely use a single color when working on a project.

Bring more warmth and texture to every project you make.
Get your free 3 Cozy, Textured Stitches guide.
Subscribe to the Measured and Stitched newsletter and your free stitch guide will be on its way. You’ll learn three easy, textured stitches that bring calm and variety to your blankets – plus you’ll get my weekly emails with patterns, tutorials, and cozy crochet encouragement.
Stitch Multiple
Since the Front Post Treble Crochet is typically used as an accent stitch or technique, there isn’t a particular stitch multiple that is associated with the stitch.
Stitch Abbreviations (US Terminology)
ch – chain
dc – double crochet
FPtr – Front Post Treble Crochet
dc – double crochet
yo – yarn over
amazing stitch tutorials from top designers
Go Beyond the Basics
Adding texture to your crochet projects just got easier!
This eBook includes 20 stitch tutorials that will help you elevate your crochet skills. With over 100 pages of information, including instructions, photos, videos, links to patterns, and more, this eBook is perfect for anyone wanting to go beyond the basics of crochet!
How to Crochet the Front Post Treble Crochet (FPtr) Stitch
The steps to complete one Front Post Treble Crochet stitch are shown below. You will see the written instructions first, then a photo to support the instructions.
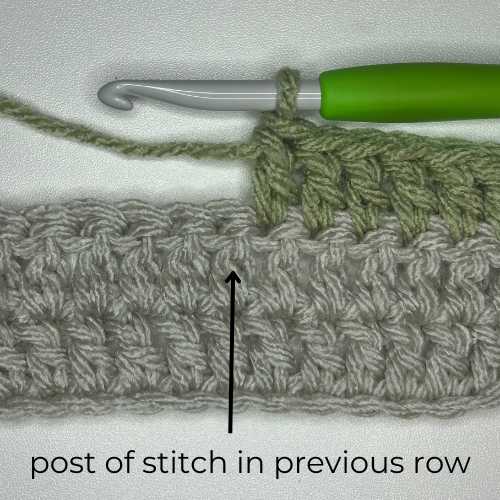
Note: In order to complete the Front Post Treble Crochet, you’ll need at least one row of stitches below the working row. I’ve completed two full rows of dc and a few double crochet stitches in Row 3 before making a Front Post Treble Crochet.
To complete this stitch, we’ll be working around the post of the stitch in the previous row. The arrow in the picture points to the post in the previous row so you can see where to place the stitch.
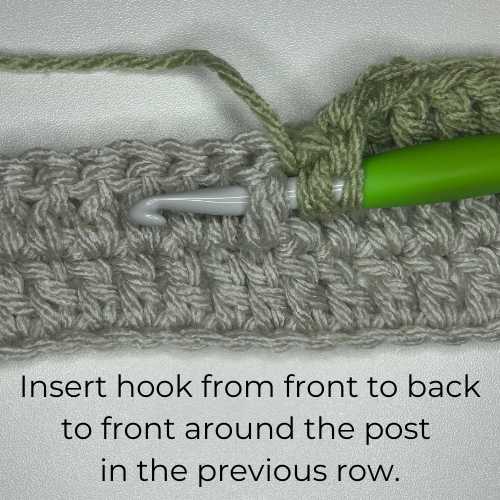
- Yarn over 2 times

2. Insert hook from front to back to front around the post in the previous row (Note: your hook will be behind the post, and the post will be pulled forward)
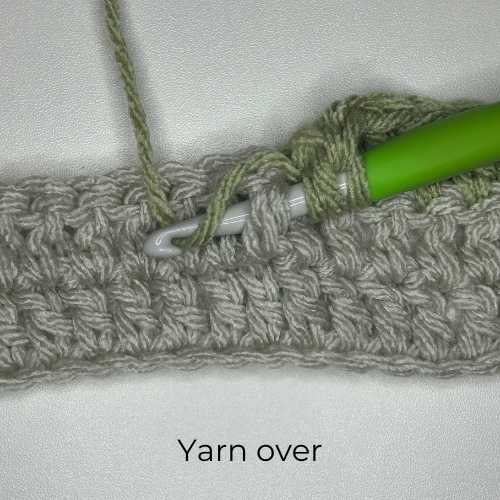
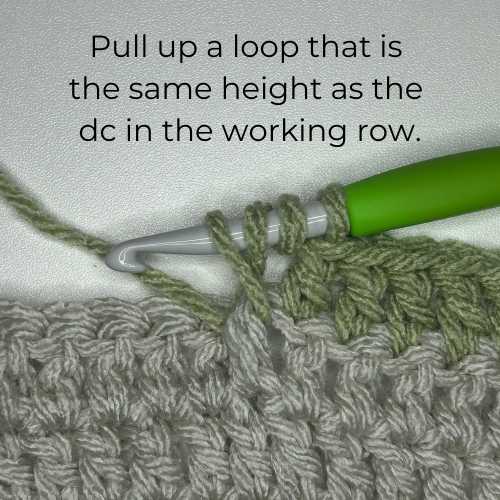
3. Yo and pull up a loop that is the same height as the dc in the working row
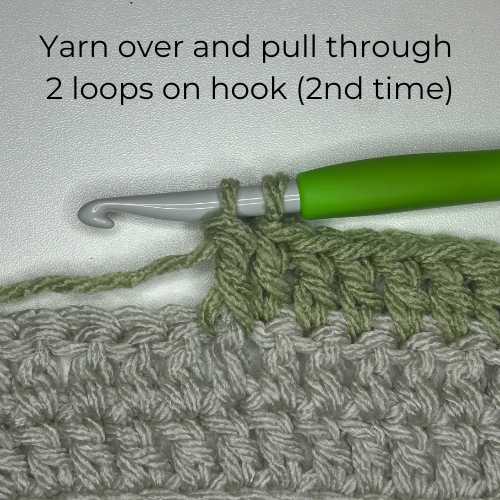
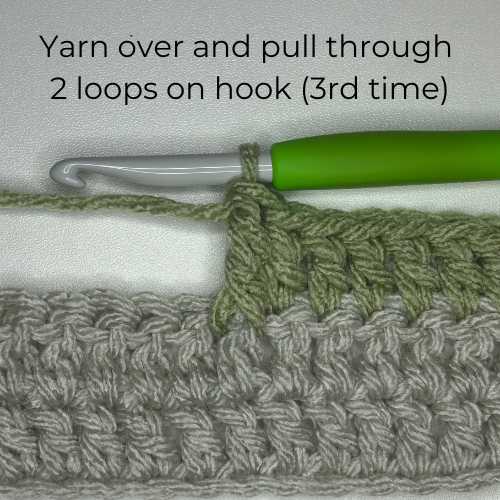
4. [Yarn over and pull though 2 loops] 3 times

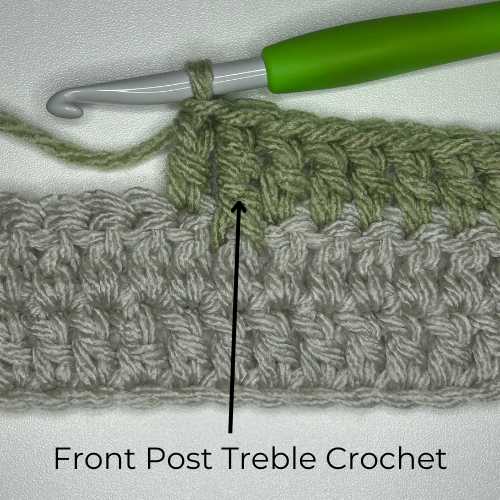
Finished Stitch: Front Post Treble Crochet
Other Helpful Information:
Here are a few more things that will be helpful to know as you’re working with the Front Post Treble Crochet stitch.
- The Front Post Treble Crochet can be used in a variety of ways. The post you’re working around will vary based on the project you’re completing.
- This stitch is often paired with the Back Post Treble Crochet stitch when creating ribbing and cables.
- The technique of working around the post of a stitch can be used with any standard crochet stitch, and is used in stitches like the Waffle Stitch and the Apline Stitch.
Want to master this stitch? Here’s a project to try! The Twin Ridges Baby Blanket pattern uses Front Post Treble Crochet and Back Post Treble Crochet to make beautiful vertical lines that add rich texture to the easy baby blanket project. You can find the free pattern on the blog!
Save it for later!
Being able to reference instructions while you’re working on a project is always helpful. Be sure to Pin this stitch tutorial so you can find it again later!
This pattern and its images are copyright protected and the sole property of Measured and Stitched LLC. Please do not redistribute, transfer, or sell the pattern, or alter it to claim as your own. You may sell any products you create from this pattern. Please credit the designer by linking online listings at www.measuredandstitched.com, tagging @measuredandstitched, or using the hashtag #measuredandstitched.